


We did some really hard things together, but arguably the most wretched job of all was "The Stair Project".

There are some tall tales in our neighborhood about the people who lived here before us. We have heard that a literal zoo resided in the house we now call home. The most reliable source says there were 17 dogs living inside, and who knows how many cats and birds. After our landlord bought the house, (sight unseen) he gutted it down to the studs. New sheet rock, paint, and flooring went in. While I'm not wild about the design choices or fixtures, I can't deny that it beats the soiled carpet and bright turquoise paint of it's previous life.
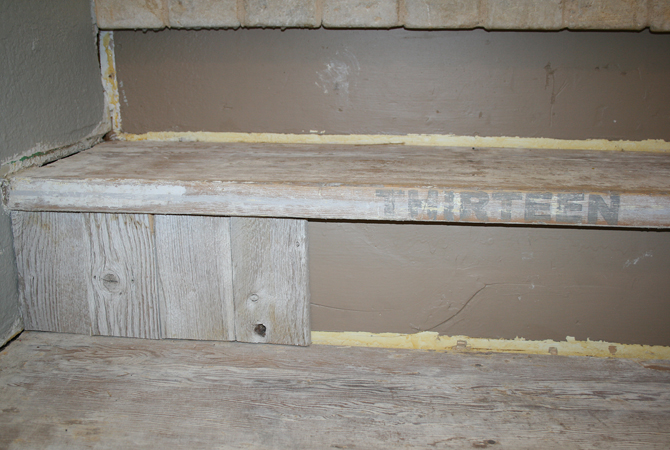
It seems the only thing he didn't rip out and re-do was the staircase. We scrubbed and scoured the house before we moved in, but every time I used the stairs, there was an awful, indescribable stench. I can live in a home that isn't posh, but dirty freaks me out. You can imagine my frustration after I scrubbed the walls and steps with bleach (multiple times) and still couldn't ditch the odor.
One day, I just snapped. Has this ever happened to you? You just take a crow bar and a hammer and go to town? There was this ridiculous quarter round framing out every inch of every step. The trim had never been caulked, there were big gaps that just collected dirt and filth. I called in the troops (Jake and Carter, ages 7 and 9) for some back-up and we ventured into completely unknown territory. At last, the guessing game had come to an end. The horrible smell was coming from the mounds of dog hair, packed into every miniscule crevice behind the pitiful trim.

I know. Hold me.
The little boys were warriors, and we had it all scraped out and swept up before lunch time. The clips are not a funny prop. They were literally dry heaving. I've probably scarred them for life.

Anyhow, once we got the area all scrubbed down and cleaned up, I had a situation on my hands. Ginormous one inch gaps everywhere, bad porch paint, and no clue how to remedy the situation. I was actually happy enough to have the smell gone that I didn't do anything for a couple of months but think about what kind of miracle I would have to dream up in order to save the steps.
The first thing I did was to strip all the brown porch paint off the treads. That's a very short sentence to type, and sounds really easy, but it took hours and hours in real life. As soon as that was done, I painted some faint gray stripes and numbers, centered on the face of each tread. (tutorial to come) I also started playing around with some old picket fencing I had picked up out of a pile of trash down the street. We were on our way home from church one day when I spotted some panels of fencing. My kids begged me not to stop and load it up in my dress while everyone coming home from church could see us. So as to not embarrass the children, I listened to them, came home and changed, then went back with Andrew to pick it up. And it's good. There was lots of it, and it will creep up again in other projects.

In the midst of the madness one day, my adorable friend Melanie stopped by to drop her little boy off to hang out with Carter. She was asking me what my plan was with the stairs, and I told her how much I loved staircases with a nice, thick stair skirt. The stair skirt is the piece of wood that runs alongside the stairs, all the way up the wall.

Um, no, this is not my house.....
The skirt is always installed before the stairs are built and put into place. Trust me now...... I had done some serious research regarding pretty little stair skirts, and had come to realize it was close to impossible to install such a thing without ripping the whole staircase out and completely starting over, which was just not an option.
Melanie sat on the top step and didn't say much for a few minutes. Then she looked over at me and asked for some blank paper and tape. I raced to gather the supplies, excited to see what was going on in her head. She started making what I like to call a "paper doll pattern". Once she explained to me how she thought it would work, I was so giddy with excitement I probably skipped my nap that afternoon. Her plan was to make a pattern out of paper, trace it onto some 3/4" MDF, and cut the pattern out with a jigsaw. I was completely game, and thought it was a brilliant plan. Andrew looked at us both like we were from another planet. I'm so used to that look now, that when he looks at me normal, I ask him what's wrong.

Over the course of several more (all day) visits from the stair angel Melanie, we tackled something we had never done before, but couldn't wait to try. Of course it took about 50 hours longer than we thought it would, (that's no joke) but the further we got into it, the more excited we became!


After we finished all of that, it was time to fill and caulk. There were some sizable gaps.

It's nothing that a gallon of wood filler and 15 tubes of caulk couldn't fix. On the really big gaps I used wood filler and a putty knife, and the smaller cracks got a healthy dose of caulk. Then came hours of sanding to get the surfaces as smooth as glass and ready to be painted.
After the dust settled, I decided I couldn't deal with how worn out the stair treads looked. Although I love the lived-in, worn out industrial look, the landing for sure was just too distressed for my taste. I was off to Lowes, and lucky enough to find a gallon of opaque gray stain made for outdoor decking in the Oops section for $5.
As you can see, Plan A has now morphed into Plan K at this point. I decided it would look great to paint the center section gray to freshen up the very shabby finish and then add a thick, crisp white stripe on either side to brighten things up. Cara helped me do this, bless her heart. I also washed the picket fencing in a watered down gray, and cut and nailed them to the risers. I ended up having to repaint the numbers in white, which G enthusiastically volunteered to help me with. I love that girl. Not to be left out, Mia sanded the handrail down to get rid of the orange-ish stain that was on it. I stained it a dark walnut and waxed it for a smooth finish. I found the perfect rug at Ikea for the landing. It has a nice, thick pile, and it's the only piece of carpet in the house. Needless to say, that little 3 x 3 square of plushness is the crowd pleaser in our casa.
Are you still reading? You're a true friend!
Obviously, I couldn't and wouldn't have attempted this project without the help of my very talented and able crew of friends. These girls are the best, and their can-do attitudes make my every dream a reality. It's a shame I get to take the credit for this transformation, because it was definitely a group effort. Girls, I'm going to have you over for lunch, and we are eating on the stairs!
Here are some final pictures, and I do think they are done. For reals.


And the newest addition to our family since Valentine's Day, who has sat at that top step and watched my every move of the stair intervention. Meet Leo.

I hope you enjoyed this journey more than I did.


I LOVE this! Loved the journey, and what a great result!
ReplyDeleteLove this transformation and every detail of the story, truly!! I've been tossing around the idea of painting my stairs for about 3 months now and I keep running into posts that keep encouraging me to do it. These are my foyer steps that are now covered in gross carpet. I'm gonna do it!! Thanks for the added push and I'll make sure to let you know how it went:). Great post!!
ReplyDeleteHi Kim:
DeleteI would LOVE to see pictures of your stairs when you finish them! I'm so happy to have inspired you to go ahead and just do it! Please send pictures upon completion.
Super cool!
ReplyDeleteLove your stairs, but most of all, I love that your friends surrounded you to help. Every girl needs to have, and be, a friend like that!
ReplyDeleteKate
You n your friends are amazing! What a GORGEOUS result! It's so satisfying, isn't it, to take something from boo! to woohoo!? Your boys are awesome!
ReplyDeleteWarm wishes,
Tanya.
Australia.
Wow!!!! I can't believe how awesome it looks, great job to both of you!!!
ReplyDeleteSo honored to have been a small part of the transformation! And to do it surrounded by such a group of talented gals. Someone pinch me.
ReplyDeleteJill, it looks so amazing. You are amazing. Way to go on the finish work! I love the before and after. I forgot how horrible those stairs looked in the beginning!! I can't wait to see the finished product in person. Cara, well put. It is so fun working together with a group of such talented girls.
ReplyDeleteWow! High fives all around for tackling such a huge project! It looks amazing! And I'm glad the funky smells are gone, that would totally drive me to sudden action with a crowbar too!
ReplyDeleteGorgeous, I love it!
ReplyDeleteOh my sweet GOODNESS!
ReplyDeleteI know you worked hard on these stairs...but they looks so great and UNLIKE anything I've seen. Love the skirt--
via FJI-SNS
~Pat
Holy awesome! Love the plank detail and the stencil! Thanks so much for linking. :)
ReplyDeleteWow... to have friends who actually think up a wonderful plan to compliment the one you have in place, then
ReplyDeletecome and help you complete it is a true blessing. The staircase turned out awesome...
As for the boys, it will be a lesson they will retain the value of long after the stench is gone ! LOL
They will talk about that project with Mom for years to come- but have a new respect for you as it takes
a great deal of TIME to teach our children things of VALUE. GO MOMS !!
Diana
How do you walk up and down those stairs every day with out stopping and staring at them all the time? They turned out amazing. I too have some stairs that are giving me woes. Thanks for the inspiration.
ReplyDeleteAwesome! Love this! Found you via A Humble Abowed (her stair case pictures).
ReplyDeleteI am now your newest follower! :) Anyone who can do this and has such helpful friends has got to be someone I should follow! :)
ReplyDeleteOh my!! What a transformation!! Such a great job. Thank you for being honest about the amount of work, too! Can't wait to check out more of your blog!
ReplyDeleteThis is amazing!! What terrific and talented friends you have.
ReplyDeleteTotally impressed. That was a HUGE and very successful job. Pinned. Glad you shared with Funky Junk, visiting over from Donna's party.
ReplyDeleteJoy
HOT STORY 2022
ReplyDeleteค่ายเกมสล็อต
รีวิวบาคาร่า
ปป-แทงบอล
slot
รีวิว
Thank you .
I can see that you are an expert at your field! I am launching a website soon, and your information will be very useful for me.. Thanks for all your help and wishing you all the success in your business.สล็อตแตกง่าย
ReplyDelete